So, last weekend our dear friend Leah had us over for dinner. I made "Eric-and-Julie's-Super-Duper-Salad," which is a recipe I don't really need to share because each person has his or her own salad predilections. Ours is noteworthy for its somewhat exhaustive array of ingredients: mixed greens, carrots, celery, bell peppers, garbanzo beans, feta, artichoke hearts, tomatoes, and any other miscellaneous veggies we have around. Since Amanda and I are now subscribing to Los Poblanos organic boxes, which arrive every Tuesday, our salads, and my cooking, might feature some ingredients not often on our menu. This happened this week when we got mushrooms, which I deplore, so Eric was just happy as can be to eat them up, slightly steamed, with the steamed beets that I made him. Just a note: we'll probably not need to get a box full of organic veggies and fruit from Los Poblanos when our own garden starts to come in, in full! But it sure is neat for now.
Anyway, so, in addition to the salad we took to Leah's, I took a cheese ball, which seemed to really knock everyone's pants right off. But, I tell you, it is such a snap to make, and I wasn't lying when I said it took me about sixty seconds to make it. So, so you can take a cheese ball to all of your weekend fetes, here's the recipe:
Cheese and Cashew Appetizer Ball (I have no idea of a better name)
White cheddar cheese
Feta cheese
Brie, with rind removed
Onion, yellow or white
Salted cashews
Paprika
Waxed paper
Plastic wrap
Method:
How much cheese you use will depend on how much of each cheese you have on hand. I used about a quarter to a half a cup of feta, a half a cup (grated) of cheddar, and what would amount to maybe a third of a cup of brie (if you smushed the brie in a cup; envision that). So, place these ingredients in your Cuisinart (or other food processor) along with a quarter of an onion and maybe twenty cashews. Process this mixture until it binds into a ball. (A note before I continue with the method: the rationale for using brie and feta here, for me, was that I knew that most cheese balls depend on cream cheese to bind them, which I did not have. So, feta and brie act, as soft cheeses, in the same, albeit in a more sophisticated, way.) If your mixture is not binding, add more feta (it's cheaper than brie, so use it in a larger amount, I'd suggest).
On your sheet of waxed paper, sprinkle about three tablespoon-fulls of paprika and shake the paper to distribute. Now, with your hands or a rubber spatula, being careful of the blade, remove your ball of cheese mixture from your food processor. Roll it into a nice ball in your hands and then roll it around on the paprika on the waxed paper until it is totally covered. Now, put this ball on the sheet of plastic wrap and wrap it up, twisting the plastic wrap that you've brought together at the top, to keep the ball in shape. Then, place it on a smooth surface in your refrigerator for at least twenty minutes. Serve with crackers. Yum.
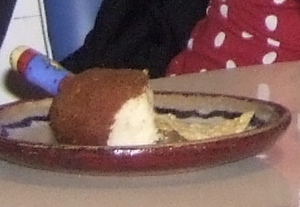
Here is a pretty unprofessional photo of my partly-eaten cheese ball.
So, the final topic of this post will be kale. We have an amazing kale plant that, hold your breath, has lasted us two and a half years. It has survived two winters and you might wonder whether it has "bolted" or whether it is gross and bitter. Perhaps I don't have the most sophisticated palate, but it tastes all right to us, and I simply pull off its "bolting" flowerettes and its leaves then continue to flourish. It goes pretty dormant in the winter, but now that it's spring, kale production has begun again. So, yesterday I made my first small kale harvest and used it in vegetarian posole (pronounced "po-sole-eh").
If you're from New Mexico, you might associate posole with cold weather or Christmastime. I do. But, with fresh kale, it's fun and delicious to have posole in the spring or summer too! When Eric and I both go out some nights during the week, he to the gym and I to ballet, I usually make something in the crock-pot for us to eat when we get home. So, I made posole last night, and it was deeelish.
Crock-Pot Vegetarian Posole
A crock-pot three-quarters full of water
Vegetable bouillon/broth mix, 2 tablespoon-fulls (I use Seitenbacher)
1 large can hominy (this is "corn without the germ," if you've never heard of it)
1 to 2 cups loosely packed washed, torn kale, with thick stems removed
.25 to .5 cup chopped green chile (the amount you use will very much depend on how spicy your chile is, so BE CAREFUL)
1 can red kidney beans (or any beans that you like that you have on hand)
Chunk or heel of parmesan cheese
1 onion, chopped
2 garlic cloves, minced
Salt, if desired
Method:
Combine all of the above ingredients in your crock-pot and turn it to "high." At the "high" setting, the posole will only need to cook for three hours or so. The parmesan cheese, mind you, will make the posole thick, and the hominy kernels will also expand, so as you try this recipe out, you might find you need more liquid, so adjust to your taste. As you can see, this is a very easy recipe, and a very filling meal. But please, do be careful with the green chile. You can either use "fresh" roasted, which perhaps you bought frozen last season, or you can use frozen chopped or canned chopped, both of which are readily available here in New Mexico (you might not come by it so easily elsewhere). We ate our posole with little sourdough bread loaves. It was super. When you're dishing up the soup, by the way, you'll likely come across the chunk of parmesan. You can just discard it or find something else smart to do with it.

See how rich and hearty the posole is?
Happy cooking everyone. My next post will probably be about a vintage cookbook; I have a few in mind. Have a great weekend!

