Well, HELLO everyone! After a six-month blog hiatus, I'm back! And, in my opinion, it's a great time for sharing cooking and craft ideas, and I think you'll agree.
A friend of mine in the pacific northwest told me that she was awash in cranberries and that prompted this post. I know most of you are familiar with the divine pairing of cranberry sauce and turkey and on this day, Thanksgiving, that is what many of you will be having. (And for those of us who are vegetarian, we just let our cranberry sauce co-mingle with our various other Thanksgiving foods on our plate -- or at least I do!). So, today I am going to post a recipe for cranberry sauce, and this is not your gelatinous can-shaped standard, which, of course, has its own place in many people's hearts. Today's cranberry sauce recipe is a fresher, sometimes looser, citrus-and-spice affair, and I hope you love it.
Ingredients:
2 pounds fresh cranberries
2 cups water
2 cups white sugar
grated rind of half an orange
.5 to 1 tsp ground cloves (per your taste)
.5 to 1 tsp ground cinnamon (per your taste)
A pinch of salt
Method:
Boil the water in a large saucepan. Once the water has reached a rolling boil, add the cranberries. Once the boiling point has been reached again, cover the pot and let the cranberries boil for several minutes until they begin to pop. Then, stir in the sugar, the spices, and the salt. Boil mixture uncovered until the liquid reaches the "jelly" point (when a spoon-dip's-worth of the syrup "sheets" off of the spoon). To reach the jelly point, you might need to boil the mixture for twenty minutes or so.
While you are waiting for the mixture to reach the jelly point, you can prepare your glass jars to can the sauce (if you plan to can some jars for use later; if you don't, you'll just put the completed sauce is glass containers of your choice to store in the refrigerator). To can, first fill a boiling-water canner (or a big stock pot) with water and bring to a boil. Place your glass Mason jars in the canner to sterilize them in the boiling water. Have your lids and rings clean and ready to go. Once your cranberry mixture is ready to your liking, plop the lids and bands into the boiling water in the canner to sterilize them. Let them boil for a minute or two. Take out the glass jars; set them on a clean tea-towel. Place a round cake-cooling rack (if you have one) in the bottom of the canner for the jars to sit on while they're processing (if you have one; this is not necessarily required).
Next, using a sterilized metal funnel, ladle (with a sterilized metal ladle) the sauce into the hot glass jars. Leave a bit of head-space. Place the lids on top of the jars and then screw on the bands. Place the jars in the boiling water in the canner (carefully, with tongs) and process for ten minutes. Remove jars carefully and let them sit very still. The lids should POP down within a minute or so (but often this can take longer and you can just let them sit for a few hours undisturbed). Any jars whose lids have not popped down within a few hours should simply be stored in the refrigerator and used soon.
This year, I made a looser version of this sauce, so it was more of a traditional "sauce" with more of a liquid consistency, rather than a jelly consistency. When you're boiling your cranberry mixture, you can make this call. Boil your cranberry mixture for a shorter period of time if you want a more liquidy sauce.
Enjoy! Happy Thanksgiving!
Thursday, November 27, 2008
Wednesday, May 28, 2008
Pyrex-orama
Hello everyone! Sorry I have been so neglectful of my blog! This is going to have to be a very short post, as I am writing this from the airport. We've been traveling a lot, but pretty soon, I will be done with my summer travels and will be better about blogging. Promise.
So, when we were in the Bay Area we stayed for two nights with our friends Ethan and Kelly and their darling little daughter Evie. Ethan and Kelly have decided that they are going to get rid of all of their plastic storage products and instead use -- one of my favorite things of ALL time -- Pyrex! I didn't have time to take any photos of my Pyrex collection; that'll have to wait for another post. But, until then, to whet your palate, visit this amazing Pyrex site. If you check out their "pattern reference" section, I can give you all many awesome patterns I'd like you to keep your eyes peeled for (hint hint: Christmas Holly).
Ethan and Kelly found at a thrift store in their area some great pieces: divided serving pieces, glass-topped casseroles, small ramekins. All of these items I approve. Their patters are Horizon Blue and Square Flowers. I'd love to know what all of you are squirreling away in your kitchen cupboards! My friend Emma has some nice pieces in Green Dot Squares, Designs, and Friendship -- I think. I inherited a stash of Butterprint -- which is pretty popular I think -- from my Grandma Rose. Once I get some photos up of what other patterns I have, we can all do a better job of collectively ooo-ing and ahhh-ing about the wonders of Pyrex.
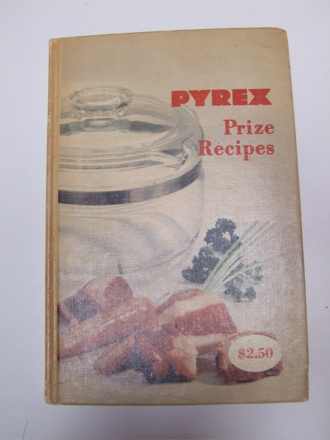
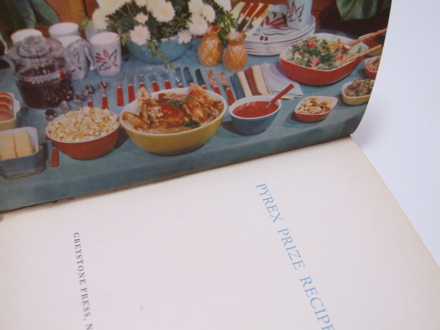
What I do have to share with you right now are some photos from an incredible little Pyrex cookbook that I picked up in Louisville, Kentucky, about four years ago. While the recipes are divine, what's better are the photos of what you can do with your Pyrex. I love to see all of the pieces used in such creative ways, in all of their resplendent glory!
So, when we were in the Bay Area we stayed for two nights with our friends Ethan and Kelly and their darling little daughter Evie. Ethan and Kelly have decided that they are going to get rid of all of their plastic storage products and instead use -- one of my favorite things of ALL time -- Pyrex! I didn't have time to take any photos of my Pyrex collection; that'll have to wait for another post. But, until then, to whet your palate, visit this amazing Pyrex site. If you check out their "pattern reference" section, I can give you all many awesome patterns I'd like you to keep your eyes peeled for (hint hint: Christmas Holly).
Ethan and Kelly found at a thrift store in their area some great pieces: divided serving pieces, glass-topped casseroles, small ramekins. All of these items I approve. Their patters are Horizon Blue and Square Flowers. I'd love to know what all of you are squirreling away in your kitchen cupboards! My friend Emma has some nice pieces in Green Dot Squares, Designs, and Friendship -- I think. I inherited a stash of Butterprint -- which is pretty popular I think -- from my Grandma Rose. Once I get some photos up of what other patterns I have, we can all do a better job of collectively ooo-ing and ahhh-ing about the wonders of Pyrex.
What I do have to share with you right now are some photos from an incredible little Pyrex cookbook that I picked up in Louisville, Kentucky, about four years ago. While the recipes are divine, what's better are the photos of what you can do with your Pyrex. I love to see all of the pieces used in such creative ways, in all of their resplendent glory!
Look at how nicely that table is set! Isn't it inviting?

I made this cake one year, for Easter at Michelle's mother-in-law's sister's house in Michigan. The colored coconut flakes are the piece de resistance, if you ask me. I actually used Peeps too. It was useful to learn how to make marshmallow icing from this cookbook's instructions.
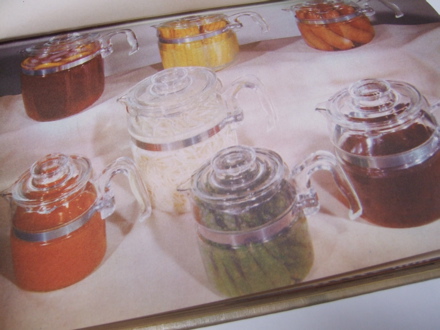
I own one of these coffee percolators. Little did I know I could employ it in multiple ways, as shown in this photo. Next time I want to make asparagus or corn-on-the-cob, I guess I should just whip out the ol' percolator!!
Enjoy your Pyrex my friends. I will compose a more coherent blog entry next time, I promise!!
Thursday, May 1, 2008
Irises and Throw-Back Casseroles
Greetings!
First, I need to seek advice on my irises, which are just lovely -- they are beautiful with peach, yellow, and white flowers. The problem is that once they bloom, they fall over! What might be the cause of this? I'll post a picture later if I can, but for now, let me describe: they seem to maybe grow up toward their bloom fairly vertically, but once the big bloom opens up, the ones on the edge of the bunch just fall right over. Is this because they are top-heavy? Because their roots aren't deep enough? Because of their placement in the garden? Any advice will be greatly appreciated, because all of my neighbors irises don't seem to have this same problem.
OK, so I said I was going to write something about an old cookbook or two. So, I want to begin the this old Nordic Ware promotional cookbook:
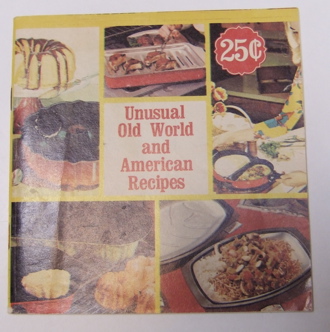
As you can see, this cookbook promotes itself as a collection of unusual new-world ("American") and old-world recipes, and I tell you, it is not just the recipes that recommend this fine little volume. First, I am sure a lot of you have owned Nordic Ware in your life; it's very versatile. A good product. But the sheer array of items detailed in this little paper book is amazing. And the colors. You can get the bundt-lette pans in "natural, harvest, avocado, or tangerine" exteriors! There are instructions for making gelatin-molds in their specific mold pans -- one featuring a cornucopia with a pumpkin and a corn-cob -- using different colors of gelatin! So, your corn-cob would be yellow and your pumpkin orange! The enterprising housewife had a true partner in the Nordic Ware home-economists who created this beauty of a cookbook! Other interesting recipes are the no-bake fruitcake, a snappy mold called "False Frommage," various kinds of Ebleskiver (I am not sure what that is), and sukiyaki. Nordic Ware showcases its product line, which includes the following items (among others): the "Ten-in-One Griddle King," a "Large Krumkake Iron," a "4-in-1 Broil, Roast, Bake, and Serve dish," and a "Bundt Brand Cake Stand with Cover."
My favorite recipe from the book bears mentioning, if only because it is my favorite for its "grossness" quotient:
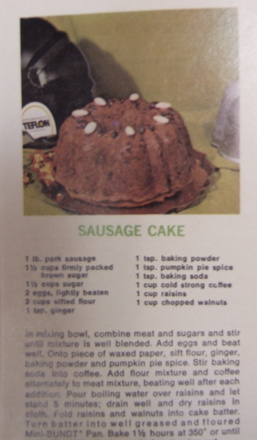
I am not sure you can make out the ingredients list for that recipe, the "Sausage Cake," but I will go through them with you. The recipe calls for pork sausage, brown and white sugar, eggs, flour, ginger, baking powder, pumpkin-pie spice, baking soda, coffee, raisins, and walnuts.
The sheer stomach-churning power of this cake might be matched -- for me -- only by the dessert our friends Brett and Maria described to us last night: figs stuffed with blue cheese and wrapped in bacon. Blehhhhhhh. All three of those things make me ill. But, I suppose some people live for that sort of thing, and maybe it's those people who smack their lips, drool, and recline in a reverie induced by the very name "Sausage Cake." I do like sweet and savory together (think chocolate-covered pretzels), but this takes it to a whole new level. I guess maybe putting meat in a sweet pie makes some sense -- mincemeat pies have long been a holiday staple. But, they do not contain spiced pork sausage, that I know of. I think that's the kicker for me. In a dessert? Come ON!
OK, well, there are some nice sounding casseroles in the Nordic Ware cookbook (like the "Chinese Casserole"), which sure is appropriate since it comes from the American "Era of Casseroles," otherwise known as the '60s and '70s. At least I think about it that way. Our next cookbook features a fuller array of nice casseroles, and it is the "Your Share" cookbook, from the year 1943, and it is in many ways far more interesting than the one discussed above:
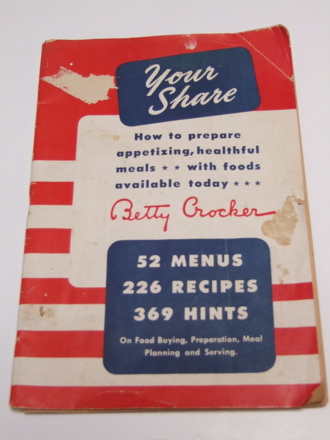
The cover of this cookbook discloses that it intended to teach the industrious war-time housewife "How to prepare appetizing, healthful meals with foods available today." The book was presented by Betty Crocker and it does feature several products produced by the General Mills company. What I love most about this cookbook is the illustrations:
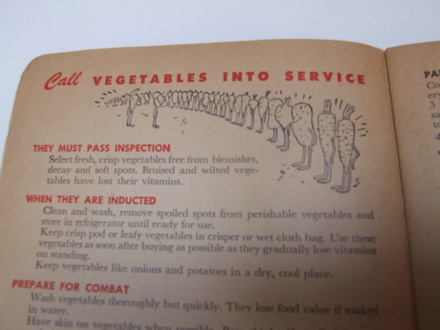
The image and the accompanying text surely employ war-time rhetoric, and recruit the housewife as a force as important to the health of the nation as the young men (and women) fighting abroad. The introductory text declares:
"The efforts and accomplishments of women today are boundless! . . . [W]hatever you do--you are, first and foremost, homemakers--women with the welfare of your families deepest in your hearts. Now you face a new and more difficult problem in the management of your homes. . . . Never has there been such an opportunity, and a need, for what American women can contribute. So to you women behind the men, behind the guns, we offer this little book, with its daily helps for wartime meal-planning and cooking. And we salute you!"
With rousing prose like this, it is no surprise that images of carrots lined up at attention accompany the phrases "into service," "pass inspection," "inducted," and "combat"! Look at those beaming root vegetable in the above image! How proud they are!
The final image I will share is my favorite:
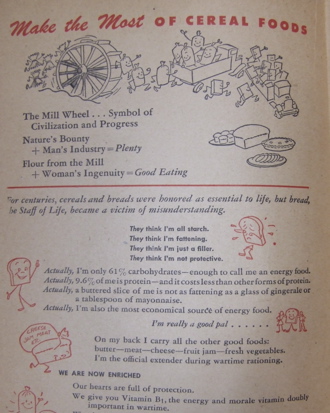
They think I'm all starch.
They think I'm fattening.
They think 'm just filler.
They think I'm not protective.
Don't cry, poor little piece of bread! How wrong "they" are! The accompany text here goes on the extoll the many virtues of the lowly piece of bread, who finally realizes that, actually, "I'm really a good pal."
My Grandma Rose always served me the most delicious tuna salad when I would visit her in the Bronx. I learned that the recipe came from my Uncle Bob's mother, and the recipe reflects some of the teachings of this little cookbook. Because bread could help housewives stretch war-time rations (and the Joy of Cooking of that era provides recipes too that give housewives suggestions on how to do this), my Uncle Bob's mom's tuna salad recipe included a day-old piece of bread, cut up and mixed in with the other ingredients. What a secret! So, no, little piece of bread, do not despair.
I will close with a recipe shared by my Auntie Marlene, one that is perhaps more sophisticated than the war-time recipes as it has "souffle" in the title, but that nevertheless would somehow fit along-side them, for its practicality and inventive use of on-hand items, items available then and now. A house-wife in 1943 -- or a housewife, househusband, or whomever does the cooking -- would be most proud to serve this dish.
Corn Souffle Casserole
1 can creamed corn
1 8oz container sour cream
1 whole corn kernels with liquid
2 eggs, slightly beaten
1 stick butter, softened
1 8oz box Jiffy Corn Muffin mix
Method:
Combine all ingredients except corn muffin mix in a non-reactive bowl. Add corn muffin mix and stir to combine. Pour
into 2 qt baking dish. Bake at 350 degrees for 40-60 minutes or until golden brown. Makes 12 servings.
Happy gardening and cooking! Let me know if you try to make the Sausage Cake!
First, I need to seek advice on my irises, which are just lovely -- they are beautiful with peach, yellow, and white flowers. The problem is that once they bloom, they fall over! What might be the cause of this? I'll post a picture later if I can, but for now, let me describe: they seem to maybe grow up toward their bloom fairly vertically, but once the big bloom opens up, the ones on the edge of the bunch just fall right over. Is this because they are top-heavy? Because their roots aren't deep enough? Because of their placement in the garden? Any advice will be greatly appreciated, because all of my neighbors irises don't seem to have this same problem.
OK, so I said I was going to write something about an old cookbook or two. So, I want to begin the this old Nordic Ware promotional cookbook:
As you can see, this cookbook promotes itself as a collection of unusual new-world ("American") and old-world recipes, and I tell you, it is not just the recipes that recommend this fine little volume. First, I am sure a lot of you have owned Nordic Ware in your life; it's very versatile. A good product. But the sheer array of items detailed in this little paper book is amazing. And the colors. You can get the bundt-lette pans in "natural, harvest, avocado, or tangerine" exteriors! There are instructions for making gelatin-molds in their specific mold pans -- one featuring a cornucopia with a pumpkin and a corn-cob -- using different colors of gelatin! So, your corn-cob would be yellow and your pumpkin orange! The enterprising housewife had a true partner in the Nordic Ware home-economists who created this beauty of a cookbook! Other interesting recipes are the no-bake fruitcake, a snappy mold called "False Frommage," various kinds of Ebleskiver (I am not sure what that is), and sukiyaki. Nordic Ware showcases its product line, which includes the following items (among others): the "Ten-in-One Griddle King," a "Large Krumkake Iron," a "4-in-1 Broil, Roast, Bake, and Serve dish," and a "Bundt Brand Cake Stand with Cover."
My favorite recipe from the book bears mentioning, if only because it is my favorite for its "grossness" quotient:
I am not sure you can make out the ingredients list for that recipe, the "Sausage Cake," but I will go through them with you. The recipe calls for pork sausage, brown and white sugar, eggs, flour, ginger, baking powder, pumpkin-pie spice, baking soda, coffee, raisins, and walnuts.
The sheer stomach-churning power of this cake might be matched -- for me -- only by the dessert our friends Brett and Maria described to us last night: figs stuffed with blue cheese and wrapped in bacon. Blehhhhhhh. All three of those things make me ill. But, I suppose some people live for that sort of thing, and maybe it's those people who smack their lips, drool, and recline in a reverie induced by the very name "Sausage Cake." I do like sweet and savory together (think chocolate-covered pretzels), but this takes it to a whole new level. I guess maybe putting meat in a sweet pie makes some sense -- mincemeat pies have long been a holiday staple. But, they do not contain spiced pork sausage, that I know of. I think that's the kicker for me. In a dessert? Come ON!
OK, well, there are some nice sounding casseroles in the Nordic Ware cookbook (like the "Chinese Casserole"), which sure is appropriate since it comes from the American "Era of Casseroles," otherwise known as the '60s and '70s. At least I think about it that way. Our next cookbook features a fuller array of nice casseroles, and it is the "Your Share" cookbook, from the year 1943, and it is in many ways far more interesting than the one discussed above:
The cover of this cookbook discloses that it intended to teach the industrious war-time housewife "How to prepare appetizing, healthful meals with foods available today." The book was presented by Betty Crocker and it does feature several products produced by the General Mills company. What I love most about this cookbook is the illustrations:
The image and the accompanying text surely employ war-time rhetoric, and recruit the housewife as a force as important to the health of the nation as the young men (and women) fighting abroad. The introductory text declares:
"The efforts and accomplishments of women today are boundless! . . . [W]hatever you do--you are, first and foremost, homemakers--women with the welfare of your families deepest in your hearts. Now you face a new and more difficult problem in the management of your homes. . . . Never has there been such an opportunity, and a need, for what American women can contribute. So to you women behind the men, behind the guns, we offer this little book, with its daily helps for wartime meal-planning and cooking. And we salute you!"
With rousing prose like this, it is no surprise that images of carrots lined up at attention accompany the phrases "into service," "pass inspection," "inducted," and "combat"! Look at those beaming root vegetable in the above image! How proud they are!
The final image I will share is my favorite:
They think I'm all starch.
They think I'm fattening.
They think 'm just filler.
They think I'm not protective.
Don't cry, poor little piece of bread! How wrong "they" are! The accompany text here goes on the extoll the many virtues of the lowly piece of bread, who finally realizes that, actually, "I'm really a good pal."
My Grandma Rose always served me the most delicious tuna salad when I would visit her in the Bronx. I learned that the recipe came from my Uncle Bob's mother, and the recipe reflects some of the teachings of this little cookbook. Because bread could help housewives stretch war-time rations (and the Joy of Cooking of that era provides recipes too that give housewives suggestions on how to do this), my Uncle Bob's mom's tuna salad recipe included a day-old piece of bread, cut up and mixed in with the other ingredients. What a secret! So, no, little piece of bread, do not despair.
I will close with a recipe shared by my Auntie Marlene, one that is perhaps more sophisticated than the war-time recipes as it has "souffle" in the title, but that nevertheless would somehow fit along-side them, for its practicality and inventive use of on-hand items, items available then and now. A house-wife in 1943 -- or a housewife, househusband, or whomever does the cooking -- would be most proud to serve this dish.
Corn Souffle Casserole
1 can creamed corn
1 8oz container sour cream
1 whole corn kernels with liquid
2 eggs, slightly beaten
1 stick butter, softened
1 8oz box Jiffy Corn Muffin mix
Method:
Combine all ingredients except corn muffin mix in a non-reactive bowl. Add corn muffin mix and stir to combine. Pour
into 2 qt baking dish. Bake at 350 degrees for 40-60 minutes or until golden brown. Makes 12 servings.
Happy gardening and cooking! Let me know if you try to make the Sausage Cake!
Friday, April 25, 2008
Cheese and Kale
Hi there. Here's a Friday post with a few good recipes; maybe you'll use one of them this weekend!
So, last weekend our dear friend Leah had us over for dinner. I made "Eric-and-Julie's-Super-Duper-Salad," which is a recipe I don't really need to share because each person has his or her own salad predilections. Ours is noteworthy for its somewhat exhaustive array of ingredients: mixed greens, carrots, celery, bell peppers, garbanzo beans, feta, artichoke hearts, tomatoes, and any other miscellaneous veggies we have around. Since Amanda and I are now subscribing to Los Poblanos organic boxes, which arrive every Tuesday, our salads, and my cooking, might feature some ingredients not often on our menu. This happened this week when we got mushrooms, which I deplore, so Eric was just happy as can be to eat them up, slightly steamed, with the steamed beets that I made him. Just a note: we'll probably not need to get a box full of organic veggies and fruit from Los Poblanos when our own garden starts to come in, in full! But it sure is neat for now.
Anyway, so, in addition to the salad we took to Leah's, I took a cheese ball, which seemed to really knock everyone's pants right off. But, I tell you, it is such a snap to make, and I wasn't lying when I said it took me about sixty seconds to make it. So, so you can take a cheese ball to all of your weekend fetes, here's the recipe:
Cheese and Cashew Appetizer Ball (I have no idea of a better name)
White cheddar cheese
Feta cheese
Brie, with rind removed
Onion, yellow or white
Salted cashews
Paprika
Waxed paper
Plastic wrap
Method:
How much cheese you use will depend on how much of each cheese you have on hand. I used about a quarter to a half a cup of feta, a half a cup (grated) of cheddar, and what would amount to maybe a third of a cup of brie (if you smushed the brie in a cup; envision that). So, place these ingredients in your Cuisinart (or other food processor) along with a quarter of an onion and maybe twenty cashews. Process this mixture until it binds into a ball. (A note before I continue with the method: the rationale for using brie and feta here, for me, was that I knew that most cheese balls depend on cream cheese to bind them, which I did not have. So, feta and brie act, as soft cheeses, in the same, albeit in a more sophisticated, way.) If your mixture is not binding, add more feta (it's cheaper than brie, so use it in a larger amount, I'd suggest).
On your sheet of waxed paper, sprinkle about three tablespoon-fulls of paprika and shake the paper to distribute. Now, with your hands or a rubber spatula, being careful of the blade, remove your ball of cheese mixture from your food processor. Roll it into a nice ball in your hands and then roll it around on the paprika on the waxed paper until it is totally covered. Now, put this ball on the sheet of plastic wrap and wrap it up, twisting the plastic wrap that you've brought together at the top, to keep the ball in shape. Then, place it on a smooth surface in your refrigerator for at least twenty minutes. Serve with crackers. Yum.
Here is a pretty unprofessional photo of my partly-eaten cheese ball.
So, the final topic of this post will be kale. We have an amazing kale plant that, hold your breath, has lasted us two and a half years. It has survived two winters and you might wonder whether it has "bolted" or whether it is gross and bitter. Perhaps I don't have the most sophisticated palate, but it tastes all right to us, and I simply pull off its "bolting" flowerettes and its leaves then continue to flourish. It goes pretty dormant in the winter, but now that it's spring, kale production has begun again. So, yesterday I made my first small kale harvest and used it in vegetarian posole (pronounced "po-sole-eh").
If you're from New Mexico, you might associate posole with cold weather or Christmastime. I do. But, with fresh kale, it's fun and delicious to have posole in the spring or summer too! When Eric and I both go out some nights during the week, he to the gym and I to ballet, I usually make something in the crock-pot for us to eat when we get home. So, I made posole last night, and it was deeelish.
Crock-Pot Vegetarian Posole
A crock-pot three-quarters full of water
Vegetable bouillon/broth mix, 2 tablespoon-fulls (I use Seitenbacher)
1 large can hominy (this is "corn without the germ," if you've never heard of it)
1 to 2 cups loosely packed washed, torn kale, with thick stems removed
.25 to .5 cup chopped green chile (the amount you use will very much depend on how spicy your chile is, so BE CAREFUL)
1 can red kidney beans (or any beans that you like that you have on hand)
Chunk or heel of parmesan cheese
1 onion, chopped
2 garlic cloves, minced
Salt, if desired
Method:
Combine all of the above ingredients in your crock-pot and turn it to "high." At the "high" setting, the posole will only need to cook for three hours or so. The parmesan cheese, mind you, will make the posole thick, and the hominy kernels will also expand, so as you try this recipe out, you might find you need more liquid, so adjust to your taste. As you can see, this is a very easy recipe, and a very filling meal. But please, do be careful with the green chile. You can either use "fresh" roasted, which perhaps you bought frozen last season, or you can use frozen chopped or canned chopped, both of which are readily available here in New Mexico (you might not come by it so easily elsewhere). We ate our posole with little sourdough bread loaves. It was super. When you're dishing up the soup, by the way, you'll likely come across the chunk of parmesan. You can just discard it or find something else smart to do with it.

See how rich and hearty the posole is?
Happy cooking everyone. My next post will probably be about a vintage cookbook; I have a few in mind. Have a great weekend!
So, last weekend our dear friend Leah had us over for dinner. I made "Eric-and-Julie's-Super-Duper-Salad," which is a recipe I don't really need to share because each person has his or her own salad predilections. Ours is noteworthy for its somewhat exhaustive array of ingredients: mixed greens, carrots, celery, bell peppers, garbanzo beans, feta, artichoke hearts, tomatoes, and any other miscellaneous veggies we have around. Since Amanda and I are now subscribing to Los Poblanos organic boxes, which arrive every Tuesday, our salads, and my cooking, might feature some ingredients not often on our menu. This happened this week when we got mushrooms, which I deplore, so Eric was just happy as can be to eat them up, slightly steamed, with the steamed beets that I made him. Just a note: we'll probably not need to get a box full of organic veggies and fruit from Los Poblanos when our own garden starts to come in, in full! But it sure is neat for now.
Anyway, so, in addition to the salad we took to Leah's, I took a cheese ball, which seemed to really knock everyone's pants right off. But, I tell you, it is such a snap to make, and I wasn't lying when I said it took me about sixty seconds to make it. So, so you can take a cheese ball to all of your weekend fetes, here's the recipe:
Cheese and Cashew Appetizer Ball (I have no idea of a better name)
White cheddar cheese
Feta cheese
Brie, with rind removed
Onion, yellow or white
Salted cashews
Paprika
Waxed paper
Plastic wrap
Method:
How much cheese you use will depend on how much of each cheese you have on hand. I used about a quarter to a half a cup of feta, a half a cup (grated) of cheddar, and what would amount to maybe a third of a cup of brie (if you smushed the brie in a cup; envision that). So, place these ingredients in your Cuisinart (or other food processor) along with a quarter of an onion and maybe twenty cashews. Process this mixture until it binds into a ball. (A note before I continue with the method: the rationale for using brie and feta here, for me, was that I knew that most cheese balls depend on cream cheese to bind them, which I did not have. So, feta and brie act, as soft cheeses, in the same, albeit in a more sophisticated, way.) If your mixture is not binding, add more feta (it's cheaper than brie, so use it in a larger amount, I'd suggest).
On your sheet of waxed paper, sprinkle about three tablespoon-fulls of paprika and shake the paper to distribute. Now, with your hands or a rubber spatula, being careful of the blade, remove your ball of cheese mixture from your food processor. Roll it into a nice ball in your hands and then roll it around on the paprika on the waxed paper until it is totally covered. Now, put this ball on the sheet of plastic wrap and wrap it up, twisting the plastic wrap that you've brought together at the top, to keep the ball in shape. Then, place it on a smooth surface in your refrigerator for at least twenty minutes. Serve with crackers. Yum.
Here is a pretty unprofessional photo of my partly-eaten cheese ball.
So, the final topic of this post will be kale. We have an amazing kale plant that, hold your breath, has lasted us two and a half years. It has survived two winters and you might wonder whether it has "bolted" or whether it is gross and bitter. Perhaps I don't have the most sophisticated palate, but it tastes all right to us, and I simply pull off its "bolting" flowerettes and its leaves then continue to flourish. It goes pretty dormant in the winter, but now that it's spring, kale production has begun again. So, yesterday I made my first small kale harvest and used it in vegetarian posole (pronounced "po-sole-eh").
If you're from New Mexico, you might associate posole with cold weather or Christmastime. I do. But, with fresh kale, it's fun and delicious to have posole in the spring or summer too! When Eric and I both go out some nights during the week, he to the gym and I to ballet, I usually make something in the crock-pot for us to eat when we get home. So, I made posole last night, and it was deeelish.
Crock-Pot Vegetarian Posole
A crock-pot three-quarters full of water
Vegetable bouillon/broth mix, 2 tablespoon-fulls (I use Seitenbacher)
1 large can hominy (this is "corn without the germ," if you've never heard of it)
1 to 2 cups loosely packed washed, torn kale, with thick stems removed
.25 to .5 cup chopped green chile (the amount you use will very much depend on how spicy your chile is, so BE CAREFUL)
1 can red kidney beans (or any beans that you like that you have on hand)
Chunk or heel of parmesan cheese
1 onion, chopped
2 garlic cloves, minced
Salt, if desired
Method:
Combine all of the above ingredients in your crock-pot and turn it to "high." At the "high" setting, the posole will only need to cook for three hours or so. The parmesan cheese, mind you, will make the posole thick, and the hominy kernels will also expand, so as you try this recipe out, you might find you need more liquid, so adjust to your taste. As you can see, this is a very easy recipe, and a very filling meal. But please, do be careful with the green chile. You can either use "fresh" roasted, which perhaps you bought frozen last season, or you can use frozen chopped or canned chopped, both of which are readily available here in New Mexico (you might not come by it so easily elsewhere). We ate our posole with little sourdough bread loaves. It was super. When you're dishing up the soup, by the way, you'll likely come across the chunk of parmesan. You can just discard it or find something else smart to do with it.
See how rich and hearty the posole is?
Happy cooking everyone. My next post will probably be about a vintage cookbook; I have a few in mind. Have a great weekend!
Thursday, April 24, 2008
Garden "Channel"
So, welcome to my new blog! Here I will post images of various recipes I've made, various goings-on in my garden, various items in my eclectic house-wares collection, coupled with as much witticism and insight as I can muster. Oh, and I'll also ask questions of those who share these same interests.
I'd like to start by saying that I've been outside watching my garden grow, as it were, and things seem to be doing just fine, but I am still nervous about seedlings making it through the night since it is only April 24th. We're in Albuquerque, so there is a chance of a frost still, and the wind does blow pretty hard this time of year, so this causes me some garden anxiety. I began many seeds inside about six weeks ago and some of the little seedlings have been moved into their own little pots. My husband built me a cold-frame and I started some mustard greens and kohlrabi in it six weeks ago and just today I moved some of the larger plants into the regular garden alongside the beet, chard, carrot, and collard seedlings that emerged from the soil about three weeks ago. I weeded out some little seedlings to give the new plants more room to grow, but neither patience nor solid garden know-how is a strength of mine. What I lack in gardening education, I do try to make up for with either, a) dedication, or b) obsession. That is why this post is called "garden 'channel.'" When my garden really takes off, in usually early June, I spend a lot of time staring at the plants in the garden. My husband will occasionally come out, while I am inspecting my tomato plants, and say "so, what's on the tomato channel today?"
I am already tuned in to my garden channel and I am sure many of you are too (tuned in to your own, that is). So, I will post below some images of what I'm growing, and if any of you have any suggestions or comments, I'd be most appreciative. I guess I'll ask for advice on one thing before I move on to the photos.
Here in Albuquerque, where we live in the high desert at an altitude of nearly a mile, my compost pile did not rot down over the winter. This last year was my first foray into composting, and I didn't get the thick, rich compost this spring that I expected to pull out of the bottom of the pile (I guess I didn't inherit the composting gene from my Grandma Rose, who was a master at it in the Bronx). When I dug out at the bottom, what I encountered was dry leaves. My supposition is that we didn't water the pile, so it didn't stay moist enough to rot. So, we've been watering now for a month or so, but I wonder whether we should cover it with a tarp to hasten the process. Advice is most welcome on this.
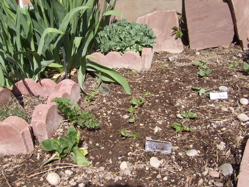
This shows one part of my little garden patch, with seedlings emerging in rocky, but nourishing, soil
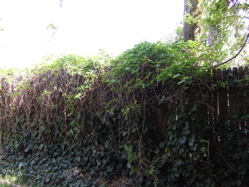
Here are our grape vines, tumbling over the wall from our neighbors' house
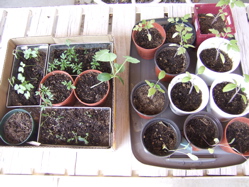
Here are my seedlings (l to r): morning glories, marigolds, pumpkin, various tomato plants, and cauliflower
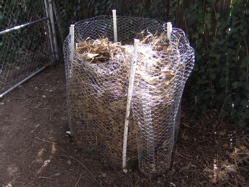
Our little compost enclosure, very rustic
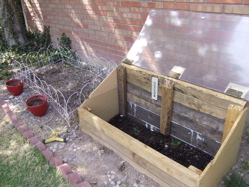
Our cold frame, with some seedlings in it, and, to the left, the bed that will be for my tomato plants, when the time is right
I'd like to start by saying that I've been outside watching my garden grow, as it were, and things seem to be doing just fine, but I am still nervous about seedlings making it through the night since it is only April 24th. We're in Albuquerque, so there is a chance of a frost still, and the wind does blow pretty hard this time of year, so this causes me some garden anxiety. I began many seeds inside about six weeks ago and some of the little seedlings have been moved into their own little pots. My husband built me a cold-frame and I started some mustard greens and kohlrabi in it six weeks ago and just today I moved some of the larger plants into the regular garden alongside the beet, chard, carrot, and collard seedlings that emerged from the soil about three weeks ago. I weeded out some little seedlings to give the new plants more room to grow, but neither patience nor solid garden know-how is a strength of mine. What I lack in gardening education, I do try to make up for with either, a) dedication, or b) obsession. That is why this post is called "garden 'channel.'" When my garden really takes off, in usually early June, I spend a lot of time staring at the plants in the garden. My husband will occasionally come out, while I am inspecting my tomato plants, and say "so, what's on the tomato channel today?"
I am already tuned in to my garden channel and I am sure many of you are too (tuned in to your own, that is). So, I will post below some images of what I'm growing, and if any of you have any suggestions or comments, I'd be most appreciative. I guess I'll ask for advice on one thing before I move on to the photos.
Here in Albuquerque, where we live in the high desert at an altitude of nearly a mile, my compost pile did not rot down over the winter. This last year was my first foray into composting, and I didn't get the thick, rich compost this spring that I expected to pull out of the bottom of the pile (I guess I didn't inherit the composting gene from my Grandma Rose, who was a master at it in the Bronx). When I dug out at the bottom, what I encountered was dry leaves. My supposition is that we didn't water the pile, so it didn't stay moist enough to rot. So, we've been watering now for a month or so, but I wonder whether we should cover it with a tarp to hasten the process. Advice is most welcome on this.
This shows one part of my little garden patch, with seedlings emerging in rocky, but nourishing, soil
Here are our grape vines, tumbling over the wall from our neighbors' house
Here are my seedlings (l to r): morning glories, marigolds, pumpkin, various tomato plants, and cauliflower
Our little compost enclosure, very rustic
Our cold frame, with some seedlings in it, and, to the left, the bed that will be for my tomato plants, when the time is right
Subscribe to:
Posts (Atom)

